

Spectral Management
A few months ago, I announced I was cutting back on blogging to record a new Color Theory album. Instead, I was hired to mix three others (Exhibition by Die Brücke, The Deadliest Fairy Tales by Rain Rain, and a yet-to-be-named album for 907Britt). Since I’ve been living and breathing mixing since June, I thought I’d give my ears a rest and share my thoughts on spectral management.
Spectral management sounds like something you’d hire a firm to do, but it simply means finding a place for each instrument in the frequency spectrum. In my last mixing article, I described how to tighten the low end of the mix using a frequency analyzer. When the competing rumble and mud is removed, you’re left with tight and punchy bass. The same philosophy applies to the rest of the mix.
Taking the concept to its logical extreme, you could carve out a discrete frequency range for each instrument using sharp low and high cut filters, like so:

While it looks good on paper, it’s a bit heavy handed in practice. It might sound okay when all the instruments are in, but removing any piece of the puzzle leaves a noticeable hole. Forget about soloing anything, because every track sounds terrible in isolation. That’s because most instruments have energy spread across the entire spectrum. Focusing on a narrow band removes the fundamental frequencies below it and the overtones above it, altering the timbre of the instrument to the point where it becomes hard to tell a violin from a trumpet.
Instead, I try to emphasize each instrument’s basic character. I’ll bring out the 80 Hz thump of the kick, emphasize the 300 Hz meat in the guitars, find a sweet spot in the 1-2 KHz range on the snare, add some 3 KHz presence to the vocal (more on that below), and maybe a dash of 15 KHz sizzle to the overheads. My simplified spectral map looks like this:

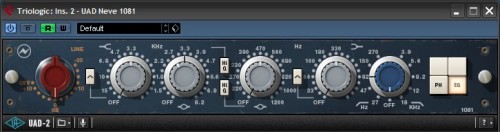
The only non-bass instrument I make room for is the vocal. I set it off from the rest of the mix using complimentary EQ. Typically I’ll use the Neve 1081 on my UAD-2 Quad to boost the vocal a couple dB at 3.3 KHz, and dig a hole out of competing instruments at the same frequency by the same amount at the same Q. The boost and cut are mirror images of each other.
The bass and drums usually don’t compete with the vocal, but I always dig the hole out of a guitar, pad, or piano. Backing vocals are a tough call. Sometimes I’ll dig the hole to differentiate them from the lead, and other times I’ll give them the boost to allow them to be heard in a dense mix. Don’t forget the reverb returns! Digging the hole out of the vocal reverb gives the vocals added clarity and immediacy, even after turning up the send to compensate for the loss in level.
Lead and solo instruments that play when the vocal isn’t in also get the boost. I emphasize whatever is at center stage at any given moment.
Sometimes I’ll use complimentary EQ on a second instrument (usually piano or guitar), but going beyond that yields diminishing returns and transforms the musical journey into a science project. At some point you just have to turn the knobs until it sounds good.
For a more detailed technical discussion of spectral management, check out this article by audio legend Dave Moulton.
Photo by Gavin Biesheuvel on Unsplash
Thanks Brian for this clear thinking on the mixing process. I’ve always had difficulty getting my head around mixing but I think it might finally be coming together now. One of the greatest things I learned was about cutting rather than boosting EQ but this article explains this more clearly. I think the best thing you can do with electronic music though is to choose the right sounds to start with so there’s not much mixing involved at all. Getting a good sound library and collection of sounds, especially drum ones was one of the best things I did.
Thanks Rick! I agree, most “EQ problems” are really arrangement problems. By starting with the right sounds, we avoid painting ourselves into a corner. Working on others’ mixes has forced me to be creative in those sorts of situations.
So cool! (and this comment was flagged as too short, so here I’m making it longer)
Hey Brian,
It’s been a while since I visited, I’m glad to see your still posting some good articles. The Taxi article is quite interesting and has had quite the ‘responses!’
Anyways, I always enjoy seeing your mixing tips since you explain yourself and the ideas/processes so well. I know this is a promotion blog more than a mixing blog, but if you ever get the time or interest. I’d like to here how you approach stereo and mono in recording and mixing. I’ve found the subject somewhat elusive yet its seems possibly important in balancing a mix. Any rules of thumb? I generally record everything into my daw into stereo tracks. Should I be rendering most of those into mono, or it just a matter of taste?
Thanks again for all the insights you have!
Thanks for dropping by! That’s a great topic for an article, though I’m not sure I’ve developed any hard and fast rules. If the source is stereo, I record it as stereo. I can always make it mono by panning the channels to the same spot. I’ll often pan stuff hard left or hard right in mono, being sure to roll off everything below 250 Hz or so to enhance the imaging.