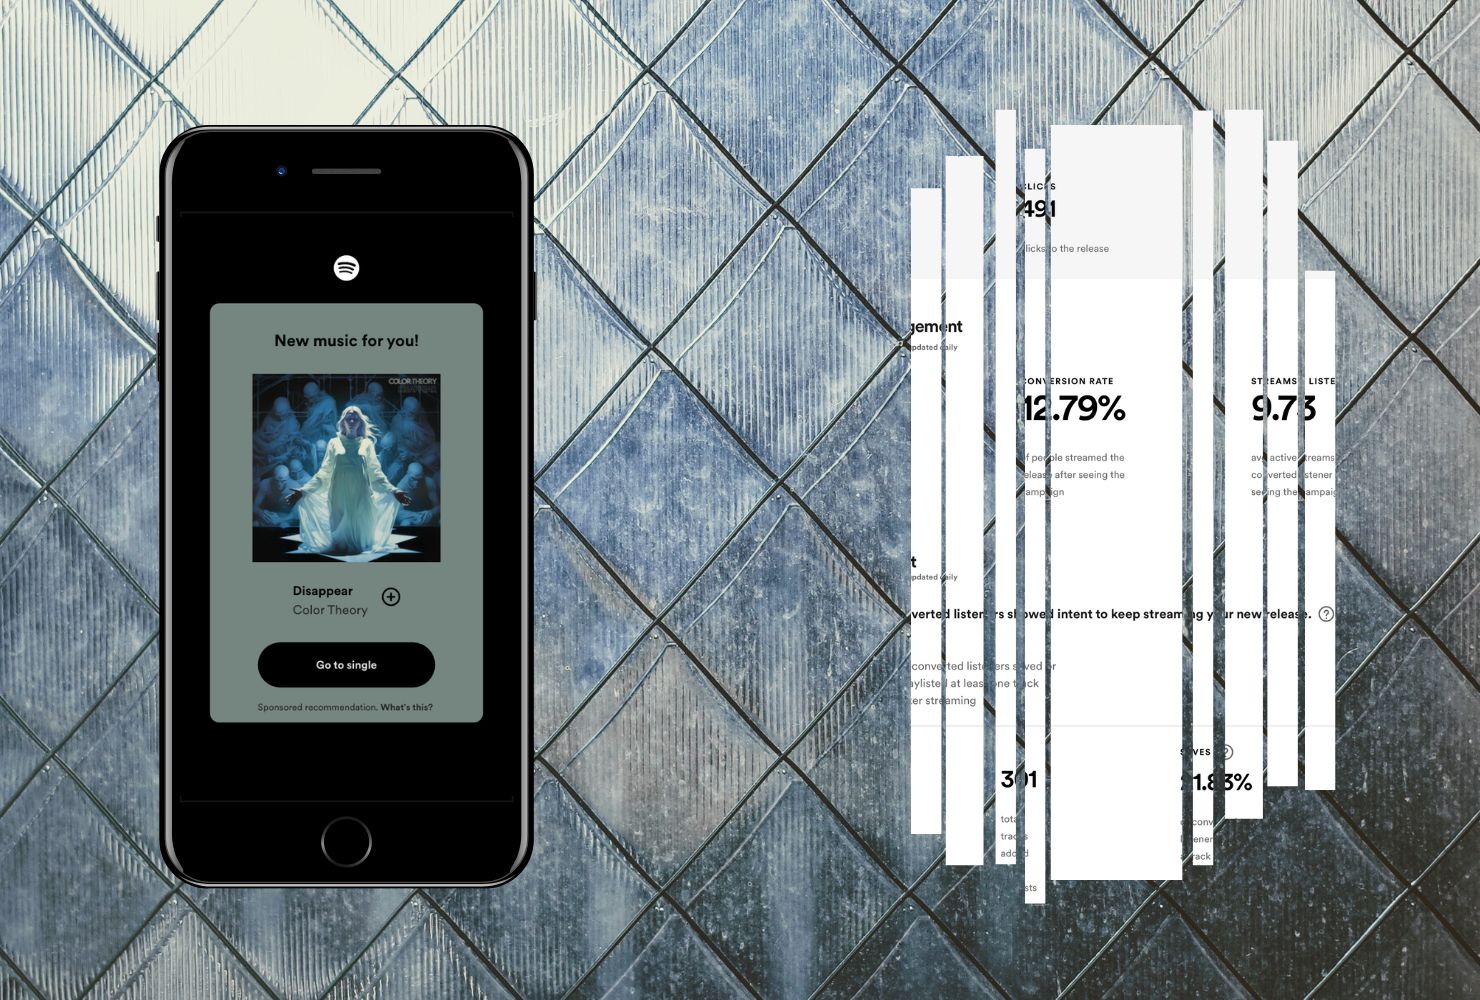
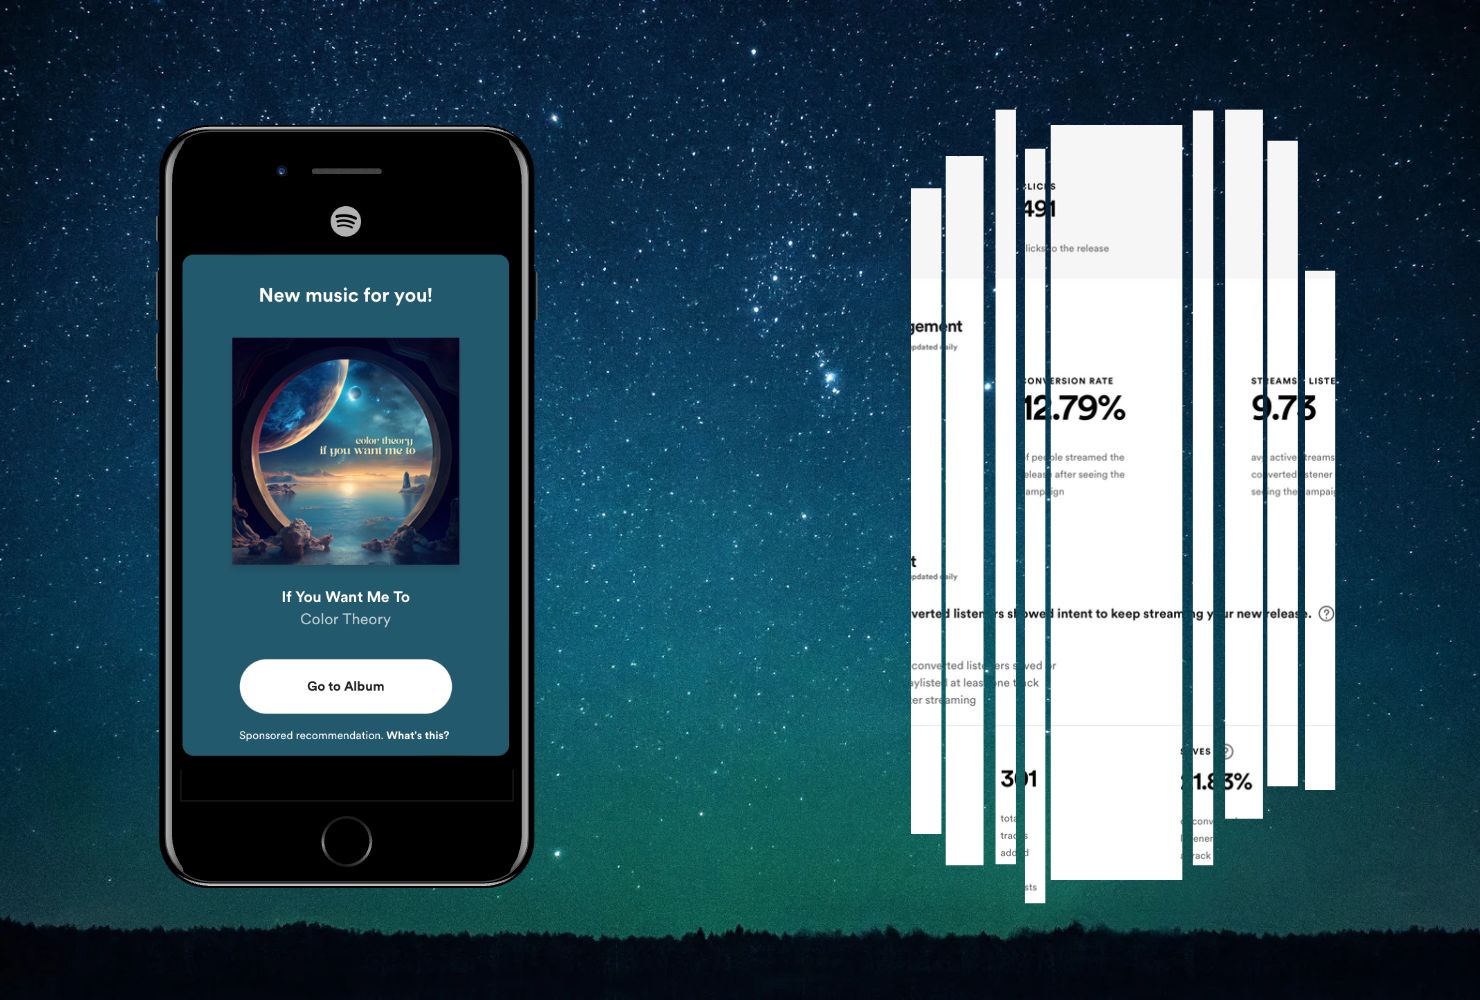
Passive Promotion

The Jango focus group

by Brian Hazard on July 8, 2010 · 11 comments

Devo got loads of press by letting fans choose everything from the songs on their new album to the color of their hats. If you’re secure enough to make your own wardrobe decisions, you can get useful feedback on your songs by conducting a focus group on Jango. It only cost me $75 to play 12 of my songs to targeted listeners 3,000 times in a single day. The information I gleaned helped me select which track would open my new album, and persuaded me to cut two others.

Jango added tons of useful features since I first wrote about it back in April of 2009. In a nutshell, you pay to have your music played alongside big name acts on an internet radio site boasting 7 million listeners. While it’s far from perfect, it’s the best passive promotion that I know of. I’ve invested nearly $1,000 of my own money in Jango campaigns over the past year and a half, and reinvested everything earned from my affiliate link (please use it if you’re not already signed up), maybe $500. I doubt I made all that money back in sales, but dozens of Jango listeners bought albums, friended me on Facebook, and followed me on Twitter. 138 of them volunteered their email addresses, which I immediately added to my mailing list. In other words, Jango listeners are real people who may become real fans.

Conducting the focus group isn’t much different from any other Jango campaign:

  1. Set your targets. If you only want to hear from female fans of The National, age 25-34, you can do that. I only used the free “basic geo targeting” to select the countries I routinely receive physical CD orders from. Your most important decision is which artists to target. Rather than opting for the old-school 80′s synthpop bands like Depeche Mode and New Order, I focused on current electronic acts like Owl City and La Roux.
  2. Upload your material. Two of my new album tracks were already playing on Jango, so I emailed airplay@jango.com to give them links to new mp3s for those tracks, plus the other 10. I also asked them to remove all but three of my earlier songs. Erin responded within a few hours, and within two days, all my new songs were live and the old ones disabled.
  3. Allocate plays. If you’ve already allocated credits to some of your focus group songs, you should remove those and wait a day to separate your old results from your focus group numbers. Then allocate plays evenly across the songs in question. I bought 4,000 plays for $100, then allocated 250 per song = 3,000 plays.
  4. Pace your plays. I allocated my plays at midnight EST, selected “fastest possible,” and burned through all 3,000 by mid-afternoon. Would slower pacing produce better results? My guess is that it would, but that’s just a hunch.
  5. Tally the scores. When your allocated plays run out, go to Reports/Play Stats and select your focus group songs one at a time from the drop-down menu on the right. Calculate the percentage of song likes to total plays, rather than just paid plays, since some organic plays will likely be mixed in as well.
  6. Remove the songs. Email airplay@jango.com and ask them to remove all the songs, except perhaps the top scorers. You don’t want your fans previewing the whole album before release! I didn’t mention my focus group to anyone, and it flew completely under the radar.

Your results may surprise you! My absolute favorite track was the least liked, with a 7% like/play ratio (no, it doesn’t have a bridge). A song that I thought was good-not-great was the clear winner at 14.5%. In the name of science, I ran the exact same campaign again. There was some movement, but the general trend was the same.

So did I cut my favorite song from the album? No way! It was one of the two songs that were on Jango before the focus group, and those two got the lowest scores. My guess is that some of the listeners already heard the song, and maybe even clicked the “like” button previously. Scoring those two songs by all-time likes over all-time plays helped bring them in line with the rest.

The vast majority of plays on my Bandcamp page are the first track of my latest album, so any song in that position needs to be a grabber! My focus group unequivocally told me which song to use, and made me feel secure in my decision to cut two of the weaker tracks, which I’ll save for a follow-up EP. As a side benefit, I got three pages of new comments on my profile, and 23 listeners shared their email addresses over the course of the two campaigns.

My all-time stats: 91103 plays (73682 paid), 8067 total likes, 3275 fans, 3352 views

{ 11 comments }

The death of the bridge

by Brian Hazard on April 22, 2010 · 33 comments

Many of my all-time favorite songs are “growers” – album tracks that don’t really grab you the first few spins, but eventually dig their hooks in and don’t let go. Few artists these days have the luxury of writing growers, because listeners aren’t willing to invest that kind of time. Unless the artist is proven to deliver, the listener will tune out and move on. While I’m a huge fan of the album format, it’s hard to deny the shifting focus from albums to individual songs. Every one of those songs needs to grab the listener’s attention and hold it until the last note – preferably longer! In order for your songs to be grabbers rather than growers, they must have clear and familiar structures.

The textbook pop song structure is verse – chorus – verse – chorus – bridge (also known as the “middle eight”) – chorus. At its most basic level, structure is repetition. If no element of the song repeats, it has no structure. Every repetition of the verse and chorus is another chance for the listener to fall in love with the song. The one section of the song that doesn’t repeat, the bridge, has been phased out in favor of a short break or instrumental solo. Don’t get me wrong – plenty of popular songs still have bridges, but it’s not the staple it once was. As much as I hate to dumb down my songs, I recognize the wisdom in simplicity. Until you’ve got a substantial following, two sections – a verse and a chorus – is plenty.

Not to say you have to follow the traditional form to the letter! There’s plenty of room for variation. You could:

  • Start with the chorus
  • Throw in an extra verse before the first chorus to allow further exposition
  • Substitute a third verse for the break for the same reason
  • Cut the first chorus in half, in which case you’ll probably want to…
  • Add an extra chorus at the end

To extend the structure a bit further, you could insert a prechorus (also known as the “build”) between the verse and chorus. While the prechorus ups the complexity by adding a third section, the crucial difference between the prechorus and bridge is that the former repeats. Should you choose to go this route, I suggest eliminating the break in favor of a third prechorus (V-PC-C-V-PC-C-PC-C).

OK, so you’ve got a catchy verse and an explosive chorus. You’ve got lyrics laced with concrete imagery that tell a universal story in a fresh and imaginative way. Too much repetition can be annoying, but it takes more than most songwriters are willing to dare. How do you arrange the song to include just the right amount, so that it repeats without sounding repetitive? Here are some ideas (I’d love to hear yours in the comments!):

  1. Break up the groove. Start the song with sparse instrumentation and stagger the introduction of rhythmic elements over course of the first verse. Or, drop the drums and bass at the end of the verse to explode into the chorus. Solo the vocals for a few beats. If you’re ending with a double chorus, thin the arrangement for the penultimate chorus to make the ending seem huge. Filter the whole mix and automate the cutoff frequency. Drop to a half time feel, or bump it up to double time. The possibilities are endless.
  2. Add a new element. A new guitar line or synth arpeggio can make a verse feel fresh, even when everything else is the same. Maybe it’s as simple as playing eighth notes on the hi-hat instead of quarter notes, or dropping the bass down an octave. Be careful not to clutter the midrange, or you’ll compete with the lead vocal.
  3. Layer the vocals. Highlight important words or phrases with harmonies, yells, or whispers. Double the chorus lead vocal, and gradually stack harmonies over the course of the song. Ad lib over the final chorus, R&B style, or superimpose lines from the verse.
  4. Vary the lead vocal treatment. Automate the reverb to swell on a long note, add a delay to the last word of each phrase, use a bandpass EQ for “radio voice,” or if you’re not afraid to jump on the bandwagon, do the autotune thing.

While there’s more to a great song than clear structure, a song without obvious repetition is destined to fail. Don’t equate sophistication with quality. Win listeners over with simple strong structures. Write songs that can be easily appreciated, and they might just promote themselves.

{ 33 comments }

Rock Band Network authoring best left to the pros

March 4, 2010

After 45 hours of work over six weeks, my song is one of the 118 approved to be in the RBN Store when it launches. My last article laid out what it takes to get your song in the game, namely a deep skill set and lots of time. While I managed to clock in [...]

Read the full article →

Rock Band Network for Dummies?

January 26, 2010

A few weeks ago, Kevin English of eleetmusic got me in to the closed beta of Rock Band Network, which provides the necessary tools to get your songs into the game. When it launches, the RBN Store will sell those songs through the game’s interface, with 30% of the purchase price going back to the artist. Now [...]

Read the full article →

My first ReverbNation street team mission

January 18, 2010

I love ReverbNation. I could write a dozen articles on the various tools they provide for artists. For now I’ll focus on one I just tried for the first time: Street Team Missions. Whenever a fan subscribes to your mailing list, they’re given the option to join your street team. You create missions to direct your [...]

Read the full article →

Help me win $507!

January 7, 2010

Full details are here, but to cut to the chase: Would you please download my track? (it’s free) http://www.reverbnation.com/playlist7?artist_id=334871 If time permits, I’d like to write about my first ReverbNation street team mission after the voting ends on Monday at 11:00 a.m. EST. UPDATE 1/11/10: We won! I’m still planning to write about the street [...]

Read the full article →

The power of no goals

January 1, 2010

I love running on New Year’s Day, if only for the change of scenery. There are dozens of new runners on the beach path, most of whom I only get to see for a week or two. Their new running shoes, still glaringly white and chemical-scented, will soon vanish into the recesses of their closets. [...]

Read the full article →

The case for online-only promotion

December 28, 2009

I promote to establish and nurture a genuine relationship with my fans. I measure my success by the number of subscribers to my mailing list. Notice I said mailing list, not Twitter followers or MySpace “friends.” I’m talking about the people who grant me permission through a double opt-in process to email them directly on [...]

Read the full article →

Why I switched to Ableton Live

December 19, 2009

Musicians might be interested to read why I switched to Ableton Live. Share

Read the full article →

Money can’t buy you love

November 30, 2009

If I had $5,000 to spend on music promotion, I certainly wouldn’t waste it on any of the following: Ads. It’s easy to get “dazzled by the numbers” when given the opportunity to reach thousands of people. We think, “If only 1% of those people bought the album, I’d double my investment!” Don’t let the [...]

Read the full article →